To calculate the dynamic baseline for a VM0047 project, a suitable donor pool with similar characteristics to your ARR project area needs to be created. In the third step, we use this donor pool to create the control plots.
Earth Blox template: VM0047 Step 2: Delineate the donor pool
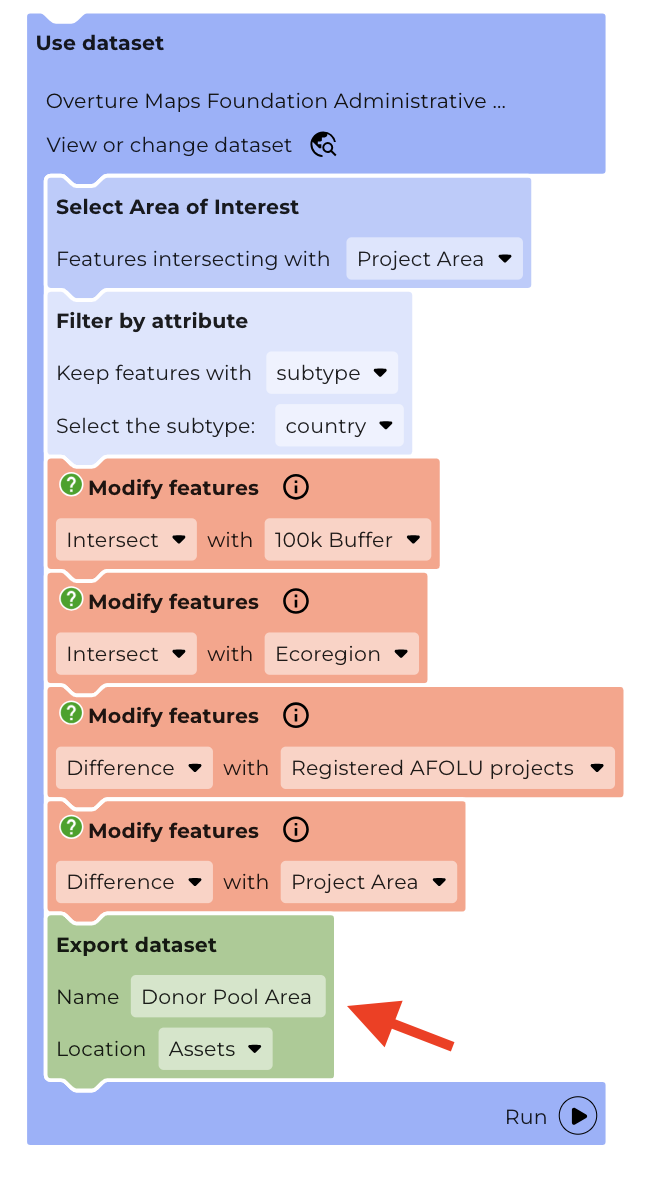
This template workflow delineates the area of this donor pool by:
- Extending the range to 100km of the project site
- Excluding areas that are not in the same Ecoregion (Using Resolve Ecoregions 2017)
- Excluding existing AFOLU projects (using the Nature-based carbon offset project boundaries dataset from Zenodo)
- Excluding areas that are not in the same jurisdictional boundary (Using Overture Maps Foundation Administrative Boundaries)
This workflow generates a donor pool area, which is exported as a dataset in a GeoJSON file format. This donor pool area is used in the next steps of the VM0047 process.
Steps for running the workflow
- 1. Load the ARR Project area
- 2. Rename your Donor pool area dataset (optional)
- 3. Run the workflow
- 4. Download your exported dataset
- Customising your donor pool area
1. Load the ARR Project area
- Add your project area by selecting Add area > Upload new feature

- Remove the sample project area by selecting Delete from the area menu

- To keep this project area in Earth Blox and use again later, check ‘Save to Assets’
If you’ve already uploaded your project in Earth Blox, select Choose from Assets.
Learn more: Uploading a feature collection to Assets
2. Rename your Donor pool area dataset (optional)
You may want to make the name of your outputted dataset more specific, to make it easier to keep track of your files. In the Export dataset block in the final workflow, click on the ‘Name’ field to add your own name for the outputted dataset (the default is “Donor Pool Area”). You may want to add a version number to your file name to keep track when iterating.
3. Run the workflow
Click the ‘Run’ button on the workflow to generate your dataset.

A popup in the bottom right corner will show you the progress of your export. As this step requires a large amount of vector processing, it may take over an hour to complete, however you can leave the project workspace without interrupting the export process.

4. Download your exported dataset
- Click on the Earth Blox logo in the top left-hand corner to leave the project workspace.
- Click on the Exports page in the navigation menu

- Click on the download icon to start the download to your device. Exported datasets are available to download for 48 hours.

Customising your donor pool area
Jurisdictional boundary
If your project area is:
- registered under Jurisdictional and Nested REDD+ (JNR)
- delineated by the national or subnational government for reporting REDD+ (e.g., delineated as a discrete Forest Reference Emission Level)
Then the relevant jurisdictional boundary is the subnational jurisdiction, so you will need to change the country boundary to a region boundary by changing the subtype in the Filter by attribute block.
Adding a water mask
If your donor pool contains large bodies of water, you may wish to mask out these areas from the donor pool. While this is not required by the VM0047 methodology, it prevents candidate control plots from being created in bodies of water that would then have to be discarded in later stages.
If this is something you would like to apply to your donor pool creation, please reach out to us at support@earthblox.io and we can assist with this.
Further customisation
Depending on the characteristics of your project plot, you may want to apply further customisation, e.g. if there have been fire disturbances in your project area.
To do this, create a workflow using a relevant image collection dataset, filter to include areas with the target characteristics, and save this dataset for reuse. You can then add the Modify features block in your ‘Initial Donor Pool’ workflow and use the ‘difference’ modification.
Continue to: Step 3: Generate sample plots
Was this article helpful?
That’s Great!
Thank you for your feedback
Sorry! We couldn't be helpful
Thank you for your feedback
Feedback sent
We appreciate your effort and will try to fix the article